


Hi Bloggers, welcome to Technique Tuesday!
I love trying new techniques, products, tools, you name it, I am the sucker that buys it and tries it, only now I am going to share it here. Pass or fail, you'll see the results and hopefully we will all learn something in the process. Do you have something you want me to try? Let me know here or shoot me an email at thescrappytree@hotmail.com and I will give it a try! Each month, I will add the new technique to our Scrappy Community for future use. So, here we go!
Today I am tackling glitter and pattern paper buttons. I have seen and heard many people talk about how cute and easy they are, so I thought I would put it to the test. Any excuse to use my Martha Stewart glitter collection makes me smile anyway :)
First up glitter buttons. The idea is to use clear buttons, something to make them sticky and some glitter. I chose three sizes of clear buttons, a few colors of Martha glitter, and my favorite glue roller.I added glue to the flat side of the button or the back of the button, sprinkled glitter all over (you can make a pile of glitter to press the button into as well) and shook off the excess. Once I turned the button over, I could see I had a new favorite way to customize buttons. This was so fast and easy, a little messy. I did notice some glitter rubbing off but for the most part the glue held it in place. I tried a tester layer of Mod Podge on the back to seal in the glitter and it worked fine, so if you are really worried, you can go that route. The other thing I noticed was there were some small spots that must not have had glue stick so they were bare of glitter. None were big enough to bug me but I did try my Quickie Glue pen in some small spots and it worked great! See the pictures below:
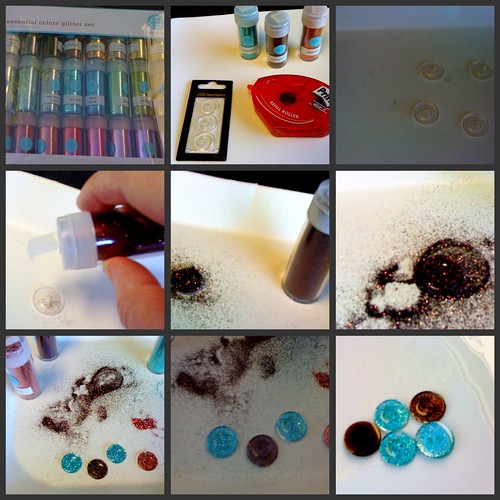
*What I used; Pritt glue roller, clear plastic buttons, Martha Stewart glitter. The last picture shows some of mine and some American craft buttons I recently purchased, can you tell the difference?
Next up pattern Paper paper buttons. This one was even easier and the possibilities are endless! I chose some red papers to go with a card I was making. Again, I took the backside or flat side, added a layer of glue stick to the button, pressed the paper down and smooth it out, cut around the button, used my sharp hole puncher to make holes in the paper that lined up to the button's holes and they were ready to go! I will definitely use this one again, very little mess, cheap, easy and totally customizable. I really want to try some bigger buttons and cool images next! See some pictures below:
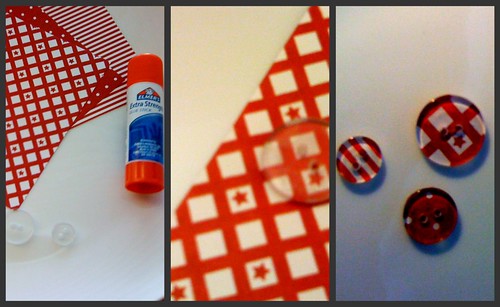
*What I used; glue stick, clear plastic buttons, pattern paper, Cricut hole puncher.
Thanks for visiting today and feel free to share any techniques you want me to try and I will do my best to show you what I create! I'll see you next month for another new technique!
Be Scrappy!
Kristin
I love trying new techniques, products, tools, you name it, I am the sucker that buys it and tries it, only now I am going to share it here. Pass or fail, you'll see the results and hopefully we will all learn something in the process. Do you have something you want me to try? Let me know here or shoot me an email at thescrappytree@hotmail.com and I will give it a try! Each month, I will add the new technique to our Scrappy Community for future use. So, here we go!
Today I am tackling glitter and pattern paper buttons. I have seen and heard many people talk about how cute and easy they are, so I thought I would put it to the test. Any excuse to use my Martha Stewart glitter collection makes me smile anyway :)
First up glitter buttons. The idea is to use clear buttons, something to make them sticky and some glitter. I chose three sizes of clear buttons, a few colors of Martha glitter, and my favorite glue roller.I added glue to the flat side of the button or the back of the button, sprinkled glitter all over (you can make a pile of glitter to press the button into as well) and shook off the excess. Once I turned the button over, I could see I had a new favorite way to customize buttons. This was so fast and easy, a little messy. I did notice some glitter rubbing off but for the most part the glue held it in place. I tried a tester layer of Mod Podge on the back to seal in the glitter and it worked fine, so if you are really worried, you can go that route. The other thing I noticed was there were some small spots that must not have had glue stick so they were bare of glitter. None were big enough to bug me but I did try my Quickie Glue pen in some small spots and it worked great! See the pictures below:
*What I used; Pritt glue roller, clear plastic buttons, Martha Stewart glitter. The last picture shows some of mine and some American craft buttons I recently purchased, can you tell the difference?
Next up pattern Paper paper buttons. This one was even easier and the possibilities are endless! I chose some red papers to go with a card I was making. Again, I took the backside or flat side, added a layer of glue stick to the button, pressed the paper down and smooth it out, cut around the button, used my sharp hole puncher to make holes in the paper that lined up to the button's holes and they were ready to go! I will definitely use this one again, very little mess, cheap, easy and totally customizable. I really want to try some bigger buttons and cool images next! See some pictures below:
*What I used; glue stick, clear plastic buttons, pattern paper, Cricut hole puncher.
Thanks for visiting today and feel free to share any techniques you want me to try and I will do my best to show you what I create! I'll see you next month for another new technique!
Be Scrappy!
Kristin


4 Scrappy thoughts:
thank you for the online lesson/tips!
I have that same glitter set! Thanks for the great tutorial, I will be giving this one a try for sure.
Great ideas! Quick, easy and best of all, cheap. Thanks for sharing. Can't wait til the next one!
These are 2 very cool techniques, and I really could not tell the difference from your glitter and American Craft's buttons.
Thanks for sharing with us =Di
Post a Comment