Thursday, January 31, 2013

Stamping with Faber Castell Gelatos

Hi!  It's Julie here today and I'd like to share how you can use Faber Castell Gelatos (which are AMAZING by the way) to stamp watercolor backgrounds on cardstock for a pretty little card.


Gelatos are pigment sticks which bare a close resemblance to chapsticks but don't use these on your lips!  :)  They are a nice, creamy color stick that is great for coloring (dry) or really neat to play with wet.  


The picture below shows the grape gelato just scribbled on a piece of white paper.  These are super fun to use on a surface primed with Gesso as they blend and spread color very well.

 The colors below were used on our project today. 


I used a Cling stamp from Unity Stamp Co. and liberally colored my gelatos directly onto the stamp.  I then used a mini mister of water to spritz water on the stamp a few times.  Then I stamped directly onto a white piece of cardstock.  This was the resulted watercolor background:

 The YouTube video shows the technique.  I hope you enjoy the VERY poorly shot video.  My normal camera girl (my lovely daughter) was at school so I rigged a 3 foot high pile of magazines to give me hands free filming!  I'll get a tripod one of these days!!!  :)


Have a wonderful crafty day!

Saturday, January 26, 2013

Making a spectacle (holder!)

Hi and welcome! Gayle here with a card and altered piece using Papermania Chronology 'Looking Glasses' and 'Cogs' stamps - I bought these new stamps on the weekend with a voucher left over from Christmas (love those!).  They're Papermania steampunk style stamps - I discovered on a recent Hobbycraft trip they have their own line now :)

I made a birthday card and glasses holder, both inspired by necessity ;)

I used a piece of 12x12 My Mind's Eye Lost & Found Two Breeze "Everywhere" Mirrors Paper for the background; on one side a green pattern and on the other a sheet of ruler type print.


For the card I used the ruler print side for the background, with a strip of the green pattern and some Tim Holtz tissue tape across the bottom and the Looking Glasses stamp in coffee Archival, mounted on green cardstock and embellished with a brown butterfly from my stash and an Idea-ology philosophy tag and brad.  The flourishes are from a Tim Holtz stamp set.

The glasses holder was an idea that came up as a result of YEARS of me knocking my glasses on the floor when scrabbling for them in the morning and being unable to find them (I'm too short sighted to see the floor from the bed!)
This is a recycled soup can covered with the ruler print side of the paper with strips of the opposite side green pattern and tissue tape added, and a piece of ribbon from my stash.  I stamped the Looking Glasses image in coffee Archival onto manila, and cut it out and inked the edges with Frayed Burlap Distress.  I restamped the image and cut out the binoculars to make them stand out, sticking them onto the original image with some foam squares.
I added a Tim Holtz vial label (glasses!) and lined the inside of the can by gluing cotton wool balls to the inside base and sides, and then glued a piece of calico to the inside rim.
The padding inside holds my glasses securely in the centre of the can, and it's easy to spot them against the light fabric in the dark mornings when I wake up :)
Seems like a simple idea but it's changed my life! lol! Well, my morning wake-up anyway ;) it never put me in a particular good mood to wake up and spend time scrabbling about down the side of the bed!

Thanks for visiting today, happy scrapping!

Gayle xx


Thursday, January 24, 2013

Versamark Resist Butterfly card

Hi!  Julie here today with a simple technique to add to your card making...emboss resist using clear embossing powder and Faber-Castell gelatos.  Gelatos are these wonderful pigment sticks that remind me a lot of chapstick in applicator and feel as you glide them on your project.  They are very fun to play with and an excellent choice for a lot of different crafting applications.  (I'll work on another video for that in the future.

Here's a look at the card.  I have to appologize that the sun was not cooperating and editing just did not help on these.

 Here's a close up of the butterfly that was done is resist.  To do a versamark resist, you simply stamp using your versamark pad (I used the hexagon background stamp from Hero Arts).  Once stamped, I sprinkled clear embossing powder on my white cardstock.  Then I used my heat gun to melt the powder.  Once that was done, I used my butterfly Nestabilites die and my Cuttlebug to die cut the butterfly.  I used My Minds Eye papers and a simple sentiment from Papertrey Ink to complete the card.  I popped up the butterfly for added interest.


Yikes!  The pictures are not great but believe it or not, the best out of what I took.  The card looks a bit better in the video below from TheScrappyTree's youtube channel.  Thanks for stopping by!!


Saturday, January 19, 2013

Stamping Basics: Versamark Valentine

Hello there!  It's Julie here and I hope you are having a good weekend.  Today I'd like to share a video on using Versamark ink and heat embossing to make a valentine card.

Here's a look at the card:


I used white cardstock for the card base to make 4" by 5.5" cards.  I cut pink panels out of cardstock and used my versamark pad to ink up my hexagon background stamp and stamp it on the panel.  Then I applied clear embossing powder to the impression while the versamark ink was still wet.  This is a slow drying ink so you don't have to be super quick at it.  Once the powder is on, you need to use your heat gun until the powder melts and is glossy on the cardstock panel. 

I next cut a small, one inch wide panel out of a different pink cardstock.  I then took my Papertrey Ink stamp (love you forever) and used my versamark pad on that.  Once applied, I used ultra fine black embossing powder and heat set it.  I then glued my small panel on using Beacon 3 in 1 glue. 

Next I cut some cute pink and white twine, making a little bow around my pink panels.  Once tied, I glued my entire pink panel onto the white card base.  Then I used some new Doodlebug washi tape to add a little something to the card front.

I stamped two butterflies from the Lawn Fawn Flutterby collection.  I used versamark and then black embossing powder.  Once heat set, I applied foam squares to add a pop.  The finishing touch was a heart enamel piece from Prima. 

Here's a link to our Youtube video:


Hope you enjoyed the video for this week and there will be another one next week on Versamark resist! 


Saturday, January 12, 2013

Butterflies and CHA

Hello and hope you're having a good weekend!  It dawned on me that I hadn't made a tag this year yet so I thought I'd better get some practice in :) This tag uses Distress Inks and Stains for the background and the small butterflies (which are from a Martha Stewart punch) and the stamps are an IndigoBlu set called Sarah's Choice.
 The buttons and large butterfly were just floating about in my stash, although I think the butterfly might have been a spare for a project I made at a workshop!  Always worth hoarding things til later ;)  for example, the clip in the centre of the butterfly is from a Scrapagogo kit.
 Our Scrappy Tree girl Kristin is going to be tweeting live from CHA on Sunday, so keep in touch with us through our Twitter account and let us know what you want to see!

Have a great weekend and thanks for visiting!

Gayle xx

Thursday, January 10, 2013

Stamping Basics: Inks!!!

Hello everyone!  It's Julie here with two videos to tell you about the types of inks that are available on the market today. I must appologize for the somewhat shaky videos.  I did it one handed and I'm no video expert! Here's a simple breakdown of the types of ink:

Chalk Ink:
*Nice color selection
*Quick dry

Dye Ink:
*Memento dye ink is the best for using Copics and watercolor medium.  Waterproof when dry.
*Lots and lots of colors and companies making these!

Pigment Ink:
*A wet ink
*Takes awhile to dry.  Ideally should be heat set or left to dry a long time until you are able to cut or handle stamped image.
*Perfect for use with embossing powder since it takes a long time to dry.

Watermark Ink:
*Sticky
*Ideal embossing medium

Here's the first video dealing with chalk ink and dye ink: 


The second video deals with pigment and watermark inks:


If you have any questions, please let me know!  Can't wait to bring you another video in the series!

Thursday, January 3, 2013

Stamps 101: The Basics

Hello everyone!  It's Julie here and I'd love to wish you all a Happy New Year!  Today I'd like to introduce you to a video series we're trying here at The Scrappy Tree for the new year.  Hopefully, each week you will perhaps learn a little something or be inspired by what you see.

Today I'd like to share a fairly short video with you that breaks down the basics of stamps.  It will tell you what types of stamps there are out there for purchase and be a beginners guide to what's out there.

Next week we will talk about inks.  We'll talk about what kinds there are and what they are useful for.

Thanks for stopping by!!


That old yarn

Welcome back!  It's a New Year and I for one am raring to go :)

Over Christmas and New Year I was transplanted out of my craft room but I'm moving back in today - hurrah!

My mobile crafting kit over most of December became knitting needles and yarn, so I wanted to share with you today some of the things I've been working on as everyone who was receiving a version of these as a gift has now received them :)

I loved this pom pom wool as soon as I saw it, it makes the most gorgeous cuddly scarves :)
 The winter in our neck (!) of the woods has been fairly mild so far temperature-wise, but I'm sure there's a cold snap just waiting round the corner which will make these duvet-scarves invaluable LOL

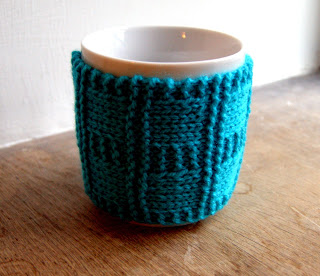
My other little bit of knitting has been these mug cosies; I spotted the pattern in a magazine and was able (with Mum's help!) to expand my stitch knowledge beyond casting on, knit, and cast off!
I admit that some members of my family have looked at me strangely when putting a small jumper onto a mug, but I just thought they were sooooo cute :)
 Looking forward to getting back to some inky and papery crafting goodness very very soon :)

Hoping you had a wonderful restful break, and all the very best for a great start to 2013!

Happy scrapping
Gayle xx