Wednesday, March 31, 2010

National Craft Month wrap-up

Hello Everyone!
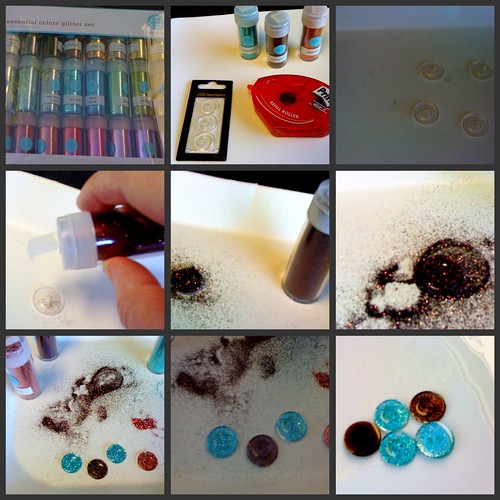
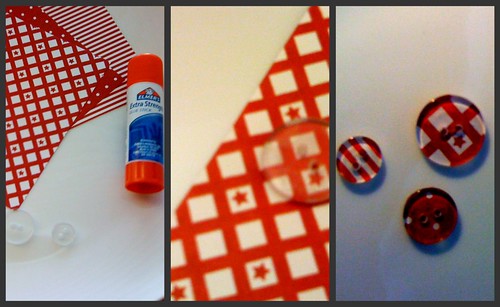
Well it has been a busy Crafty month! We thank you all for stopping by often and taking part in our many events, sparking great conversations as well as the awesome comments you all left. We shared how to alter bottle caps, dominos, ATC's and Shipping tags as well as step by step instructions for how to construct a paperbag album and some quick and easy kids crafts. From Julie's Inpsiration challenge to Gayles Art Journal Friday, we hope that you were inspired in some way to craft this month (and hopefully talk a friend into it too)


We are currently wrapping up our Spring Bloom challenge, please take the time to vote before Sunday, if you haven't done so already. Peggy, Cori and Diana gave us beautiful things to chose from. Thank you ladies for your lovely entries.


We had a few random winners throughout the month and today we have a few more!


Michelle
Rinda (Maria)
&
Cori

Please send your contact information to thescrappytree@hotmail.com. Congrats to our winners, we have lots more to share and giveaway every month, so keep commenting to win and please tell a friend.


BUT WAIT THERE'S MORE!!!


To end National Craft month, we thought how about a first for us here at the Scrappy Tree...


An ATC Swap!


The Theme: Steampunk


What is Steampunk? SteamPunk is an amazing style. It is very unique and beautiful set in the Victorian age, mixed with explorers and marvelous machines with a splash of modern technology. It really is whatever you can dream up and reminds me a lot of Leonardo Da Vinci. You can google Steampunk and find many samples. Having worked for Disney for many years, this one is my favorite (thanks to Jennie from The Artistic Stamper for taking this picture and sharing it on her lovely blog; http://theartisticstamper.blogspot.com/ )


Details for the swap below, they can also be found on our scrappy community under events/ ATC swap.

Send To:
Kristin Langlais
13671 Palomar Street
Westminster, CA 92683

Deadline: April 30th 2010


Create one ATC in the Steampunk theme and we will swap with other folks at The Scrappy Tree at the end of the month. Please upload and image to the Scrappy Community Here.


For fun, we will vote on a winner that will receive a custom ATC kit, handpicked by The Scrappy Tree team.


Need more info on ATC's- go Here


Need more info on Steampunk- Google will work but also you can go Here (these are some beautiful samples from the Gothic Arches blog - Steampunk challenge. If you click on each name, it will pull up each person's blog with artwork. they are all very cool! And our friend Jennie, did one for this too!)


Monday, March 29, 2010

Spring Bloom Challenge Voting Is Here!

Voting time is here!

Our Spring Bloom entries are in, and they are beautiful! Using the Poll above, please vote for one of the wonderful three options below. Tell your friends. The link is: http://thescrappytree.blogspot.com/2010/03/spring-bloom-challenge-voting-is-here.html


Voting will close on Easter Day and be announced shortly after.

PEGGY

CORI

DIANA


Thank you all for participating!

K

Saturday, March 27, 2010

Paper Bag Album Basics

Happy Saturday!

I hope everyone is enjoying Spring weather and having a crafty day!

We are working on Paper Bag Albums over at our Scrappy Community


Here is mine so far!


Visit us there and show us what you are working on and see Basic instructions for building a Paper Bag Album.

Have a great day!

K

Friday, March 26, 2010

Art Journal Friday

It's here again, the last Friday of the month! Welcome to March's Art Journal Friday :)


For this month's prompt I wanted to talk about something close to my heart over the past few weeks - TIME... or lack thereof! Recently I am finding that the constraints of a 24 hour day are simply not sufficient, and as a result life goes by at a hundred miles an hour!

I want you to journal what time means to you - have you got too much, not enough, are you looking back in time or do you want to look forwards? What do you do with your spare time? Is there a period of time in history which fascinates you? If you could go back in time would you do things differently?

This one is just for fun, but if you'd like to share your pages (or take a peek and leave some love!) then feel free to upload them to the Art Journal Friday group on our Ning site. This challenge will be running all weekend, we look forward to seeing your take on the theme!

Gayle

Thursday, March 25, 2010

National Craft Month - ATCs!

So as part of National Craft Month we wanted to share with you some simple little projects for Spring that might get you thinking about trying something new. If you like the look of this project, check back on the last day of March, Wednesday 31st, for news of an ATC swap and competition!

Now, I am a huge fan of ATCs (Artist Trading Cards) - it was my first step away from the more formal scrapbooking/card-making that I started with, because there were no real rules apart from the size of the space I was working on (2.5 inches by 3.5 inches). It's a small space to work on when you've been working on 12 by 12 pages, but a fun challenge nonetheless and I think less intimidating to work on when you don't have the 'rules' to follow (such as including a picture, a title, journaling etc).

Our theme for this month is springtime and blooms, so I worked on a flower themed ATC using a flower stamp - I used a couple of different techniques so I'll explain as I go along!

Starting with a plain ATC card measuring 2.5 inches by 3.5 inches...

...and a flower stamp (this one is made by Papermania)...
I stamped two flowers onto the card with embossing Distress Ink....
...and sprinkled on some Tim Holtz Distress embossing powder (this one is Walnut Stain).
This is what you get when you tap the card...
...and then heat with a heat gun and leave to cool. You can then rub the image with your finger to remove some of the powder to get that distressed look.
I stamped the same image onto the card in Fired Brick and Mustard Seed Distress Ink, and added some gold Stickles to the main two flowers to emphasise them...
I edged the card with some Fired Brick Distress Ink....
...and accented some of the background flowers with orange and yellow Sharpies...
I went over the petals of the two main flowers with Glossy Accents...
...left it to dry and then spritzed with Glimmer Mist...
After it was dry, I outlined the two main flowers with a white pen to make them stand out from the others...
...and inked the areas around them with a sponge, using the Fired Brick and Mustard Seed Distress ink, and this is what I ended up with!
The main thing I love about ATCs is that it's a small space to have fun trying some things out - why not give it a go!
Join us again tomorrow for March's Art Journal Friday challenge! This will be running all weekend and we'd love to see your take on this month's theme which will be announced tomorrow.

Thanks for looking!

Gayle

Tuesday, March 23, 2010

Another Quick, Fun Craft for Kids

At The Scrappy Tree we are definitely thinking Spring and Flowers and for today's kid's craft, we are continuing that theme! Today your little crafter will be making a flower to either decorate your home or give as a wonderful gift.

Supplies you'll need: Cupcake liners (at least 2)
Green pipe cleaner
Washable paint
vase to put your flower in

The first step is to have your little crafter paint their two cupcake liners in whatever color they'd like their flower to be. My little crafter chose orange. Let dry.

Next, have your little crafter roll one end of the green pipe cleaner into a small circle. This will form the flower's center.

Next, your crafter will gather up their two dry cupcake liners and with your help, poke the nonrolled end of the pipe cleaner through the center of the cupcake liners. Push the liners up to the rolled end and bend the rolled end slightly to create that flower center.

Next, your little crafter can put the finishing touches on their flower. Mine chose to take scissors and cut into the liners to create their flower. This is the part where your little one's creativity can shine. They could use glitter glue, other paint colors, stickers, stamps, etc to further embellish their flower if they wish. The final step is to put your flower into a vase. It is then ready to decorate your home or brighten someone else's day as a gift!

Monday, March 22, 2010

Flower fun for kids

This week we will have a few fun projects to get the littlest crafters involved in National Craft Month! Today I will be sharing a project that will be quick, easy, fun and use supplies you most likely have at home already! You should be able to do this project with the kids in your life in no time at all. Your little crafter will make a personalized flower and be able to display it in your home or give it as a little Spring gift.

Supplies Needed: White paper, Washable Tempera Paint, paint brushes, green construction paper or cardstock, scissors, glue or glue stick, wet towel for quick clean up.

I had my daugther start making her leaves for her flower. To do that, you will need the green paint and paint the bottom of one foot. This will result in lots of laughter if your little crafters are ticklish! Once the foot is covered in green paint, help the little crafter step down on the paper. **Quick tip: tape the white paper to the floor. That will avoid the paper sliding.** Do a quick clean up of the foot with a wet towel. Repeat with other foot.

The finished leaves will need to dry, but Tempera paint dries very quickly. You could start your little crafter making her flower petals while it dries.
To make the flower petals, have your little crafter pick out what color they would like to use. My little one chose yellow. We painted her hands and she placed her hands in a flower design. This part is up to your crafter. If they want a big flower, they might use a lot of hand prints! Do another quick cleanup with the wet towel when complete. Allow for drying time.
Once the flower petals and leaves are dry either you or your crafter could cut them out. You will also need to cut the stem base at this time using either green construction paper or green card stock. Use a ruler to get a straight stem. Once all pieces are cut out, it is a quick assembly using glue or a glue stick. Here is the final product from my little crafter:

Happy Crafting!!


Sunday, March 21, 2010

Happy Spring!

Spring is here and with it comes a new challenge from The Scrappy Tree:

The Spring Bloom Challenge!


We invite you to create something that shows us what spring means to you. It can be anything from an Art Journal page, a 12 x 12 layout, an Easter card or an altered piece. The only requirement, use flowers because that's what Spring is all about and what you may win if you get the most votes. Upload your picture by midnight March 28th (PST) here, we will begin the voting poll on the blog March 29th. The Winner will be announced Easter Day. Spread the word to all your friends and encourage them to come and vote for you, now take a peek at what you may win!

A Basket full of BLOOMS!


Wednesday, March 17, 2010

Shipping Tags!

I had the task to play with some shipping tags for our next project and free kit. I was kinda intimidated because I fell in love with the ones I saw at Christmas by the Tag God- Tim Holtz. He does 12 tags of Christmas every year and if you haven't had a chance to be inspired, I highly recommend it! He is leaps and bounds ahead of everyone but has such a gift for sharing, inspiring and teaching. So, on with my meager attempts.

I started with the standard size tag that most people are using but wanted to share Tall Mouse as a great resource for clear acrylic tags, chipboard tags, black, white, green you name, they have it.
The next thing I chose was the image which was easy because I had just fallen in love with this Graphic 45 line called On the Boardwalk that Simon Says Stamp has for sale. I found it in a LSS here in California names Timeless Treasures but Simon Says is another favorite of mine to buy online from. Next I picked a few Distress inks and a Glimmer Mist that I thought would go well and got started.

First up, Beach Time!


I used the following on this tag:

Black Stazon ink
Clear UTEE
Tim Holtz stamp
Distress ink- two shades
(background and edges)
Graphic 45 cut out image
Making memories button
Journaling tag-unknown
Dymo caption label maker


Next, Summer Time!


I used the following on this tag:

Brown Stazon ink
Clear UTEE
(one of my favorite things to do with this is layering it. Add one layer or powder UTEE, melt it, while it is melted, add more powder, melt it, repeat for desired effect)
Tim Holtz stamp
Distress ink- one shade (edges)
Glimmer mist Background
Graphic 45 cut out images
Ribbon-American Crafts
Dymo caption label maker


I hope you feel inspired to try some yourself, if you want us to help, shoot us an email and we will send you some images and shipping tags to get you started.

Thanks for stopping by, Have a wonderful day!

Kristin

Green Giveaway!

To celebrate St. Paddy's Day we are giving the gift of green!


Chose one item in the picture above and tell us how you have used it in a project. We will pick one lucky winner to receive the item compliments of The Scrappy Tree .

Happy St. Patrick's Day!!


Happy St. Patrick's Day everyone! I hope everyone is wearing green and ready to enjoy their day! My final St. Patrick's Day contribution to The Scrappy Tree is a card that I made for someone special!
I used a plain, off white cardstock for the base of the card and inked with green around the edges. Then I just had to crack open my new pack of Basic Grey Origins paper and I cut panels to fit the card. I cut another piece of the plain off white cardstock and used individual letter stamps (unknown manufacturer) to stamp "Lucky" on the panel. I attached all panels to the base. Next, I added a scalloped sticker from the Basic Grey paper pack above my stamped panel. I once again punched out 4 hearts using my Fiskars heart punch, inked the hearts and glued them down to form my 4 leaf clover. Next I took a Basic Grey chipboard stem and inked it to make it the right shade of green. Then I attached it to complete my clover. Finally, I used my paper piercer to poke holes into my card and I hand stitched yellow DMC floss on the card.

Before I go today, I thought it fitting that I share with you an Irish Blessing that I found in my rub on collection (the rub on is from Melissa Frances). It says:

Always remember to forget the troubles that passed away, but never forget to remember the Blessings that come each day.

I wish all of our readers the best of luck on this St. Patrick's Day and I hope you can see your blessings today! ~Julie

Monday, March 15, 2010

Technique Tuesday

Hi Bloggers, welcome to Technique Tuesday!

I love trying new techniques, products, tools, you name it, I am the sucker that buys it and tries it, only now I am going to share it here. Pass or fail, you'll see the results and hopefully we will all learn something in the process. Do you have something you want me to try? Let me know here or shoot me an email at thescrappytree@hotmail.com and I will give it a try! Each month, I will add the new technique to our Scrappy Community for future use. So, here we go!

Today I am tackling glitter and pattern paper buttons. I have seen and heard many people talk about how cute and easy they are, so I thought I would put it to the test. Any excuse to use my Martha Stewart glitter collection makes me smile anyway :)

First up glitter buttons. The idea is to use clear buttons, something to make them sticky and some glitter. I chose three sizes of clear buttons, a few colors of Martha glitter, and my favorite glue roller.I added glue to the flat side of the button or the back of the button, sprinkled glitter all over (you can make a pile of glitter to press the button into as well) and shook off the excess. Once I turned the button over, I could see I had a new favorite way to customize buttons. This was so fast and easy, a little messy. I did notice some glitter rubbing off but for the most part the glue held it in place. I tried a tester layer of Mod Podge on the back to seal in the glitter and it worked fine, so if you are really worried, you can go that route. The other thing I noticed was there were some small spots that must not have had glue stick so they were bare of glitter. None were big enough to bug me but I did try my Quickie Glue pen in some small spots and it worked great! See the pictures below:

Glitter buttons
*What I used; Pritt glue roller, clear plastic buttons, Martha Stewart glitter. The last picture shows some of mine and some American craft buttons I recently purchased, can you tell the difference?

Next up pattern Paper paper buttons. This one was even easier and the possibilities are endless! I chose some red papers to go with a card I was making. Again, I took the backside or flat side, added a layer of glue stick to the button, pressed the paper down and smooth it out, cut around the button, used my sharp hole puncher to make holes in the paper that lined up to the button's holes and they were ready to go! I will definitely use this one again, very little mess, cheap, easy and totally customizable. I really want to try some bigger buttons and cool images next! See some pictures below:

Pattern paper buttons
*What I used; glue stick, clear plastic buttons, pattern paper, Cricut hole puncher.


Thanks for visiting today and feel free to share any techniques you want me to try and I will do my best to show you what I create! I'll see you next month for another new technique!


Be Scrappy!

Kristin

Think Green!

It's time to think green everyone! St. Patricks Day is Wednesday and I was inspired to make a quick and easy breezy tag to dress up some little treats for my little leprechauns!
This tag is from the office supply store and I sprayed it with about 6 different colors of Glimmer Mist. The only ones I can remember using for sure were Sweet Clover (or course!), Suede, Coffee Shop and Patina. I used others for sure too! I stamped the clover's stem and little squiggles that all came from Michaels $1 stamp sets. I added some torn vintage music sheets which I sprayed with Glimmer Mist and inked. I made the clover using my Fiskars heart pun! To recreate the clover, you will need to punch out 4 hearts and glue the tips together! Super simple!! I glued the clover to tag and place a cute green button in the center. I used buttons on the top piece of torn vintage music sheet as well to add some more dimension. I finished off the tag with brown seam binding.

Sunday, March 14, 2010

Happy Mother's Day!

Today is Mother's Day or Mothering Sunday in the UK. On Mother's Day here, the mums get spoiled! My brother is coming over to make breakfast, and I am in charge of making some carrot cake muffins for my mum and for my parents to take to my grandmother when they visit her today!
I always ask my mum what she would like as a gift so that I can get some ideas. This year, my mum asked me to make her an altered tin with a fairytale theme, and this is what I came up with...
I painted a layer of gesso onto the tin and then used DCWV Once Upon A Time papers to cover the top and sides. My mum adores the DCWV line, so I knew she would be expecting me to use that as part of the project! I used some ribbon from my stash to border the paper at the top and bottom of the bottom half of the tin, and some DCWV ribbon to border to edge of the top half.
I used some flowers from my stash with a Jenni Bowlin button and some Sassafras Lass brads to embellish the top of the tin, along with a bird from K&Co and some pearl gems as a border. I also added some DCWV chipboard stickers as a caption.
The Once Upon A Time paper is beautifully embellished anyway (which is why Mum and me love it so much!) but where there were natural gaps in the paper I embellished with a K&Co butterfly and some Once Upon A Time die-cut shapes.

I hope she likes it!
Thanks for looking :)

Gayle

Saturday, March 13, 2010

Fruits of Our Labor...

I would like to personally thank each and every one of you have taken part in the Inspiration Challenge this month! Remember that inspiration can be found any where and every where! I would like to share the submissions for this month's challenge with you now!

OUR INSPIRATION:
JULIE'S CARD:


KRISTIN'S CARD:


GAYLE'S JOURNAL PAGE:


DI'S CARD:


You all are truly an inspiration for me! I really enjoy seeing what everyone does with the inspiration piece! Hope to see you next month!
Happy Crafting!!

Wednesday, March 10, 2010

Domino fun!

Well it's National Craft Month and we want you to try creating some new things this March!

Thought I would share an easy project today - if you have some spare dominoes around the house you might feel like giving this a go! I started out with an ordinary domino...
...and turned it over so I could use the blank side....
I inked up a Tim Holtz ink applicator with some coordinating alcohol inks ('bottle' and metallic gold)...
...and applied them to the domino all over...
...after leaving this to dry, using black StaZon ink, I stamped on an image of a fairy from a Dovecraft fairy flourish set...


...I added some Hero Arts gems...

...and varnished with some Mod Podge...

...and hey presto! A card topper, a necklace, a charm, an embellishment...
...you choose! I love what you can do with these - you can even use them to emphasise patterns on the project you are working on by printing part of the image you're working on onto the domino so that it appears raised. I would recommend using more permanent inks (such as alcohol inks and StazOn) for this project and then varnishing on top - even with the permanent inks, they can easily be scratched on the surface of the domino.

Happy crafting!

Gayle