Welcome to Art Journal Friday! It's the end of another month and with the weekend ahead I hope that you'll have some time to play around with your art journals!
Firstly, apologies for missing last month's edition; as you may already know I left the country at the end of last month to go and get married, and returned well into the second half of this month as if I had been on another planet! Again, apologies, and normal service resumes as of... today! :)
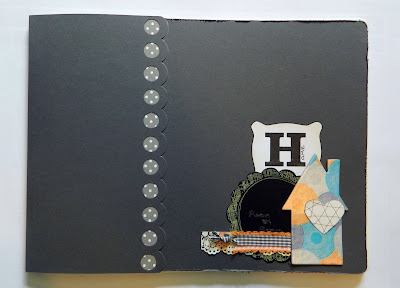
This month's theme is to be 'reflection' - I know certainly in my own life recently it has been a time of great reflection, of thinking backwards and forwards at the same time and taking stock of where I'm at. I've come to the conclusion that wherever that is, it is a happy place to be :) and so this month's page should be your reflection too!
We're having a few reshuffles with our Scrappy Tree places, so for now if you'd like to share a picture of your creations I'm going to suggest that you post a link in the comments section of this post so that we can come and visit you :) looking forward to it!
Happy journalling :)
Gayle
Friday, September 30, 2011
September's Art Journal Friday
Thursday, September 29, 2011
Halloween Twinchies
For the twinchie on the left I started with a black cardstock base. I cut a few small white strips of paper and inked here and there with black ink. I then adhered them haphazzardly to the black base. Once satisfied with the arrangement, I adhered a second black cardstock twinchie to the back of the first to cover up my small strips of white paper. I took my pumpkin image (a cling stamp) and stamped with Versa Mark ink on white cardstock. I sprinkled black embossing powder on the Versa Mark stamped image and used my heat gun to set the powder. Once cooled, I used my Copic markers to color the pumpkin. Then I used Diamond Stickles on the pumpkin's bandages. Once the Stickles dried, I used foam tape to pop the image up on the twinchie.
For the twinchie on the right, I used my embossing powder once again on this Prickley Pear stamp creepy cemetery scene. I just loved how this scene screamed Halloween!! Once the embossed image was cooled, I put the image on foam tape and mounted that on my cardstock!
I made these twinchies for a swap and I can't wait to send them out! Hope you enjoy creating for Halloween today!
Tuesday, September 27, 2011
Halloween is coming! Join the festivities! :)
It's nearly October and the Halloween parties are on their way! We're already getting excited about all things orange and pumpkin-like :) we spotted this blog party over at A Fanciful Twist and just had to join in; check out the amazing pictures!
Happy Halloween! We look forward to seeing you then!
Kristin, Gayle, Julie and Diana
Saturday, September 24, 2011
A bit of ATC fun!
Hoping that you get some time to craft this weekend :) even if it's just something small like an ATC!
Happy scrapping :)
Gayle xx
Wednesday, September 21, 2011
Good Old Fashion Scrapbook - Tutorial
Hello, Diana here with this month’s tutorial. I’ve been planning some decoration in a few rooms; with the help of Pinterest and a lot of Blogs I’ve gathered images of ideas and decoration inspiration. But since I’ve also gathered images from magazines and paint chip samples I decided to put together an Old Fashion Scrapbook, something I can write notes on or bring with me to a store so I don’t forget a color palette. Because I’ll need space my book measures 9”X12”, I used a neutral color for the inside pages.
Score a line on each page using a bone folder or a scoring board; this will make it easier to flip the pages. Punch 4 holes and tie the pages together with a piece of cotton twine, as shown in the picture. I also glued the pages on the scored part to make it even more resistant to wear and tear.

For the back use a piece of resistant carton. Glue only the scored part of the last page to the carton; make sure to put pressure on it so it sticks completely.
For the cover you’ll need two pieces of cardstock. Measure the Width of your book and add 4 more inches. I used a Border punch and a piece of pattern paper to decorate the part where my two papers are glued together. To make the fold for the Spine measure the thickness of your pages and score it on the cover, this should leave a 3-3.5” flap.

The last step is to glue the flap of the cover to the back of the book.

Here are a few examples of the inside; I used a pen, glue stick, some decorative tape and my dymo.
Tuesday, September 20, 2011
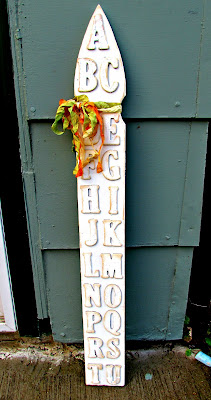
Altered fence post
Hello. It's Julie here with a little project that I made from a recent thrift store find. I found a plain wooden fence post (small, like the size for a garden) and I just knew that I could do something with it.
I started by painting the plain wood post with Antique White acrylic paint. I needed multiple coats. Once that dried, I used a Dune inkpad from Color box to ink around the post, giving it an aged look. I was at a loss of what to do with it after that honestly. So it sat around my attic craft space for a week or more. Finally, I was inspired by my new Diet Coke can (yes, that was my inspiration haha). The new can has just part of the Diet Coke logo showing and focuses on just a few letters of that logo. Hence, I decided to use letters on my post. The only chipboard letters I had were kind of ugly and very glossy so I sanded them to get the gloss off and then painted them the same Antique White as the post. Once those were dry, I inked them with the same Dune ink pad. I used my Yes Glue to glue them on the post. Since it is now Fall, I decided to use Fall leaf inspired crinkled seam binding ribbon on it as well. There's my finished project. I took a 75 cent fence post and now have a fun Fall themed decoration!
Hope you have a wonderful day!
~Julie
Wednesday, September 14, 2011
Words to Live By-2nd Half of the Album
A few weeks back I shared the FIRST part of this album from a class at Big Pictures, I was not able to finish all the pages before the due date, but I did finish them on my pace to complete my album.
The album I used is a Fancy Pants 8X8 Mixed Media Flower Book, all the papers are from Studio Calico’s Boardwalk Kit and the mixed embellishments are from my stash.
I tried something new for this project, my cousin Mimi gave me her old typewriter, I’ve been wanting one for a while; it’s been years since I used one so forgive all my mistakes, I could have really used some white-out J


 MOMENT
 CHERISH
FREE
 LIVE
LIVE EMBRACE
Tuesday, September 6, 2011
Two Cards
Hello, today I am sharing two cards I made using Melissa Frances Flashcards.
For the first card I used a tag and papers from 7 Gypsies Avignon and Washi Tape from Hambly Studio.


