Friday, April 27, 2012

Welcome to the world of t'pouch...

Welcome to your weekend and the world of the t'pouch!  Last weekend I was lucky enough not only to attend a great class at the Stamp Attic with Hels Sheridan, but I also got to spend time with Stamp Attic owner Wendy.  What a lovely weekend! Lots of chat, plenty of coffee, and some inking to boot; who could ask for more!

As before I made cakes to take with me to the workshop, and once again I forgot to take pics LOL but I took a pic of the raspberry brownies before they ever left the baking tin (or the house!) and here they are...
I can't even tell you how gorgeous and gooey these were, I shall be making them again!  I also made a banana marble cake, but to be honest those brownies, oh the brownies!!

So I travelled up on Saturday afternoon and spent the evening with Wendy and her family, which was wonderful :) we ate, we chatted, we got vocal at the telly while The Voice and BGT were on: great fun!!  And I visited Wendy's craft room which is truly a cave of wonders!  Wendy's having a little revamp at the moment so no pics LOL

On Sunday we went to the Stamp Attic and met with Hels and the other ladies (and gent!) taking the workshop, charged ourselves up with plenty of coffee, cake and other goodies, and proceeded to ink and glue like our lives depended on it!


This was a tag class with a difference; tags on tags on tags in a pouch!  You can see Hels' blog post here for more information on how we made and embellished the tags and t'pouch (tag pouch), and Wendy has also blogged here with pics of all the tags made in class :)  And here's my effort!


Lately I am totally obsessed with tags and inking, so this class was right up my street!  (see, I did say on Friday I'd be right back on the tags after that card post LOL).  Was also really feeling the sunshiney colours this weekend, and at the time I didn't realise it but this is also Hels' Sunday stamper theme so it must be getting to that time of year :)

On a different note, in case you missed Julie's post last week you can see it here; it's important to us to make sure we can support causes that are near to our hearts.  We'd love to hear your comments :)

Happy scrapping!

Gayle xx
Wednesday, April 25, 2012

Decorated Binders

Hello, Diana here; it's been 3 days since Earth Day, I hope you were able to do some eco-crafts, if you still don't know what to make here is another idea.

Lately I've been making 8.5X11 layouts, and although there are a lot of fun and pretty albums for this layout size I've found that there are also a lot of fun and pretty regular binders at office supplies.


I purchased these recycled binders a while back, they were in the clearance section (score) 


I went to my Pinterest board to get some inspiration, I've always liked This album cover from Geralyn, I started out fine but as always went crazy with the embellishing, I'm hoping to keep a nice and simple design for the other two binders I have left. 


Here is a view of the spine, I used paper instead of fabric paper, to make it more durable and easy to open and close I cut three pieces of paper and left the folds naked. I also added a light film of Mod Podge.


The papers are from Pink Paislee Butterfly Garden, buttons from My Minds Eye Kraft Funday, the flashcard from Pink Paislee Daily Junque, Metal plaque from Making Memories and the kraft doilies from Maya Road.

Album #1


Album #2


And now all my layouts are nicely organized.

The page protectors are from We are Memory Keepers.


I hope you all had a great Earth Day, we went to home depot for some paint and they gave us a little plant, how nice :)


=Di

Friday, April 20, 2012

Inky cards

So I'm giving you all a break from the tags this week.... cos I know I'll be back on them in next week's post!  lol!

I worked on a few cards this week, this first one in my favourite sunset colours uses Andy Skinner's Nature stamp set (been using this a lot lately, loving!!) and Distress Inks in mustard seed, spiced marmalade, fired brick and worn lipstick.  I went around the outside of the card with a black Posca pen to frame it.


The second card is a little more messy! I'm thinking of hanging this one on a string instead of mounting it onto a card blank so I can hang it up somewhere; the recent Friday 13th we had got me thinking about good luck and appreciating it when it comes your way :)
I stuck a scrap of card with white crackle on it across the bottom of the card and then stamped the background randomly with a Tim Holtz bingo stamp in poppy red Impress Ink and black StazOn.  I also stamped some Inkadinkado flourishes in red around the edges.  I added a small bottle cap from my stash with a small circle of red paper inside, which I sealed in with Glossy Accents and gold Stickles.
I added lots of small Prima flowers by folding them and shaping them around the bottle cap, and added some Crate Paper Random alphas from the February Scrapagogo kit.  I did a bit of doodling around the letters and the edge of the card with black and white Posca pens too :)

I'd just like to signpost you to yesterday's post by Julie if you missed it (you can see it here) - it's a great cause and certainly worth finding out more about :)

Thanks for visiting today!  Have a great weekend :)

Gayle xx

Thursday, April 19, 2012

April Is National Autism Awareness Month

Good morning everyone!  It's Julie here with a post that is near and dear to my heart.  April is National Autism Awareness Month and here at The Scrappy Tree, we'd like to present you with a number of websites to give you information on this disorder.

Autism is typically characterized as a difficulty in social interaction, verbal and non verbal communication and quite often, repetitive behaviors.  (Source: Autism Speaks).  The statistics are alarming:  1 in 88 children have autism!  1 in 54 boys are affected.  Those numbers are scary.  

My son was diagnosed on the Autism spectrum close to 10 years ago.  He is a very loving boy that I treasure each day.  It seems like Autism is so common now that most people know someone on the Autism spectrum.  The diagnosis of Autism can be a scary one for a family, but there are so many resources and even support groups available for families and kids suffering from Autism.

The following sites are wonderful sites to further explain what Autism is, as well as provide hope and support to those who know a child on the Spectrum.

www.autismspeaks.org (excellent resource)
www.autismsciencefoundation.org
www.autism-society.org

Each one of these sites also has a spot for anyone to donate to the cause and help researh.

Thank you for stopping by today.

Wednesday, April 18, 2012

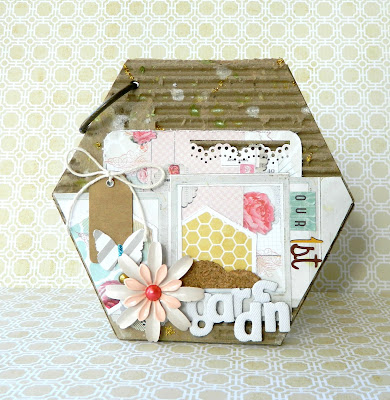
Hexagon Mini Album Tutorial

Hello, Diana here with this months mini album tutorial. Hexagon's have become a big trend in our crafty world, there are so many pretty paper and embellishment designs to choose from. This shape was the inspiration for my album.

In honor of Earth Day I've reused part of a cardboard box for the front and back cover of my album.


To make this album I started by cutting out am hexagon template.

A piece of cardstock paper will be easier to fold, I used a thick cardboard piece and a bone folder and it was kind of hard to make perfect folds.

Start by cutting a 5.5" x 6" square.


Make sure the 6" side in down and the 5.5" up. fold in half like shown in the image bellow.


And fold again in half as shown in the image bellow.


Mark a line in the middle of your square, you can either measure it or fold it in half.
Mark a dotted line from the top part of the line (A) to the bottom right corner (B), cut along that line. 


Unfold and you'll have a nice hexagon, all the sides should have the same measurement.


For the covers and inside pages I cut out 6"X5.5" squares and used my template to give them the hexagon shape.


I used one of KP's amazing sketches from her Sketchbook 4 class to make the cover design. And the papers are all from My Minds Eye Follow your Heart collection. 


I haven't decorated the inside yet because I still need to take some photos of our garden once it is in full bloom :)

Don't forget that Apr/22 is Earth Day.

Have a great day.

=Di

Saturday, April 14, 2012

Inky layers

This one took a while to dry between layers! LOL
Again I used my new favourite Distress Stains(!) for this tag, in broken china, fired brick and picket fence, but what I really loved about this tag was the top layer of stamped script in picket fence which I stamped on top of the other layers - the Distress Stains go onto stamps really easily to give a painty effect when you use them.  Bring those background stamps to the foreground!

I started by building up a really messy inky background, lots of layers of Distress Stains and spritzing with water and just generally making a lovely mess :) I added the central image (one of my faves! Steampunk Debutante by Graphic 45) and a few background images; Tim Holtz chequers stamped in fired brick Distress Ink and Tim Holtz grids stamped in saddle brown StazOn.  The script stamped in picket fence Distress Stain over the top is also a Tim Holtz stamp - love how it stands out against the dark background!  I went around the edges with vintage photo Distress Ink and voila!  Grungy inky mess with lots of layers :) the most fun!

I also wanted to share a tag made with leftover ink! lol!  The tag below is the sister tag to the one I blogged in last week's post here; after spraying vibrant turquoise Dylusions ink through the Creative Expressions compass mask, there was still ink left on the mask itself so I pressed it onto this manilla tag to get a fainter outline of the compass design.  I sprayed once or twice with the Dylusions ink to give some more colour, and outlined parts of the design in baby blue Stickles, which made the ink bleed a little - liked this effect!  I added some Tim Holtz tissue tape to the top and bottom and stamped a small Fancy Pants flourish in broken china Distress ink at the top, and then went round the edge of the tag with broken china to finish it off.
Thanks for visiting!  Stay scrappy :)

Gayle xx

Wednesday, April 11, 2012

34

Hello, Diana here with the inside pages of the post binding album I shared two weeks ago, the theme of the album is my husbands 34th birthday dinner.

I used Studio Calico's 4X8 wood grain Journal cover and painted it with gray acrylic, once it was dry I added some black mist and once that was dry I put a light coat of Gesso. The banner die cut wood piece is from My Minds Eye, I misted it with a dark brown color.


I am taking KP's Sketchbook 4 class, the page design is based on one of her sketches. 


All the papers are from My Minds Eye Miss Caroline-Fiddlesticks collection.


 I used edger punches from EK Success and the Pinking circle punch is from Martha Stewart.


As always I hope I was able to bring some inspiration to your day.

=Di

Saturday, April 7, 2012

Distress stains and spray inks

Good afternoon and welcome to the weekend!  Today I have some tags to show you using distress stains and spray inks, both of which are fairly new to me but I love them! :)

This first tag uses broken china and fired brick Distress Stains (plus a bit of water sprayed on and some inky fingers!) for the background, with flourish stamps for the large flourish at the bottom and some Tim Holtz stamped script and chequers in the background (stamped with fired brick Distress Ink and brown StazOn).  The butterflies are plain die cuts that were coloured with fired brick Distress stains and stamped with flourishes, with the body coloured with black Posca pen. 
 The Distress Stains are delightfully messy and I can't wait to get some more colours!


For the tags below, I used Dylusions spray ink in vibrant turquoise for the tag on the left, and a broken china Distress Stain for the tag on the right, through masks to make the backgrounds for the tags.  The Dylusions ink works really well; I've tried a few spray inks but they haven't really worked the way I expected; well this one did! And the colours are awesome :)  The brick mask is a Prima one, and the compass mask is by Creative Expressions.
For the brick tag I stamped the birds, tree and rushes from Andy Skinner's 'Nature' stamp set using black StazOn and then added vintage photo Distress Stickles to the rushes.
For the compass tag, I added a strip of Tim Holtz tissue tape and then embellished with some eyelets, some vintage photo Distress Stickles and some die cut cogs which I painted using the techniques from Andy Skinner's class a few weeks ago (really enjoyed that!) - see here for the blog post.  I wish the sun would come out, those rusty brassy colours look great in the sunshine!

Andy is giving away some blog candy this weekend, so make sure you visit his blog to be in with a chance of some goodies!

Have a great weekend, stay scrappy! :)

Gayle xx

Wednesday, April 4, 2012

Pinterest Inspiration

Hello, Diana here with another Pinterest Inspiration post.

This wonderful creation is from Cathe Holden, I am so glad I found her blog (thank you pinterest) because she has a lot of amazing vintage projects.

Source - Blog: Just something I made by Cathe

I really like her reverse canvas, if you are interested she gives a tutorial HERE; I might try making one of those in the future, but for now I kept mine a little more simple so they would match my scraproom decoration.

All the frames are from a thrift stores. I spray painted them in white and added the Cork on the back. I bought the metal containers on etsy.


I used Fabri-Tac to glue the fabric to the back of the frame.


Little clothespins hold extras on the front of the pocket.


Here is a close up of the little gems that hang from the zipper bow.


Hope you all have a great day.

=Di