Hello, glad you could join me today for this month’s tutorial. Since May is the month we celebrate all mothers I decided to make an album using photos of my mom, my album title is “Memories”.

I got this carton jewelry box at a craft store; it measures approx. 8.5L x 6.5W x 2.5D. The album will be attached to the inside of the box using a ring binder like the one in the picture.

Step One is to make the flap longer making a cut on each of the sides of the back panel. If your box has the metal hasp like mine does, take them off and make sure that when you cover the box with paper you mark the holes for when you re-attach them.

Step Two is to cover the inside and outside of the box, I used Vintage Music Paper and re

Step Three is to add the Binder; Tim Holtz has these Ring Binders in his Idea-ology line. It’s fine to make wholes when you attach the binder since that will later be covered with pattern paper.

Step Four is to complete the Decoration of the box, since we need to cover the brads used to attach the ring binder, add a piece of pattern paper on the back panel. Add a stripe of pattern paper to the other three panels also, as extra decoration I adhered 3 layers of assorted ribbon and tied a bow with a little flower in the front.

Step Five is to reattach the metal hasp, and decorate the top of the box, I used layers of pattern paper from the beautiful My Mind’s Eye collection Stella & Rose/Mabel and a Felt Victorian Gate from Prima Marketing, added some flowers, brads, buttons, pins, a chipboard frame and ribbon.
 For the album pages I used two different sizes of chipboard from a couple of 7 Gypsies albums.
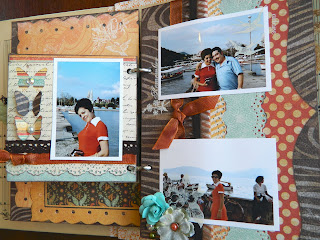
 The pages are decorated using rub-ons, flowers, ribbon and layers of paper, I tried not to make the pages bulky, but that is a real challenge for me since I tend to over embellish; to be able to get a better picture I opened the binder clip.


Here is a close up of a couple of the pages. I look at these photos and wish I could know the story behind them, fortunately in the case of this set of pictures the lake looked familiar to me, I googled the town and I was able to confirm the identify comparing the church in the background to a photo I found online :)

 As always I hope I was able to inspire you to make your own mini album, if you have any questions post them in the comments or join the Group at our Scrappy Community.
=Di


