Hello, Diana here with this month’s Mini Album tutorial. In
my search for new ways of making mini albums I went to the library and walked
out with five books, today’s album is from: How to Make Books by Esther K.
Smith. I really liked the Business Card Holder she made and decided to make it
in a bigger size.
You’ll need a Wide Strip of paper that is thin enough to
fold in both directions.
To be able to take a picture of the two first steps I used a
piece of cardstock, for the album I used some craft type wrap paper I purchased
at Michaels.
Cut the paper to a desired length; fold the entire width of
the paper to make the pocket flap.
Accordion fold the piece, leave a short fold at both ends to secure the back and cover.
This will be the body of the
album. For the cover I used a Pink Paislee 4”X6” Flash Card from their Daily
Junque ephemera pack, and for the back I cut a piece of carton and painted it
with acrylic paint.
Here are the three parts of the
album:
Now comes the part where we
decorate the accordion, I used different papers from Crates Restoration
collection, unless your folds were perfect (mine were not) I recommend that you
measure each space before cutting the paper pieces.
This is how the front looks
And the back, I added a manila
envelope to the end.
Both ends are left without decoration because that is
where the covers will be glued to.
Affix the cover pieces to the paper accordion; you can add ribbon between the covers and accordion to tie a bow.

It’s time to add the photos. The fun part of this album is to be able to tuck stuff in the pockets, I used tags and Maya Roads Kraft and Transparencies Doilies.

It’s time to add the photos. The fun part of this album is to be able to tuck stuff in the pockets, I used tags and Maya Roads Kraft and Transparencies Doilies.
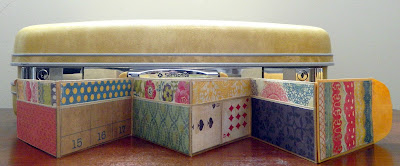
Here is a view of the closed album
And a view of the open album
A close up of the first page, I
decorated the back of the flash card with some pattern paper.
Thanks to the pocket design I was
able to add 20 photos plus the 5 I put inside the manila envelope. Here is how
I did it:
Each pocket has a photo glued to
the flap.
The tag inside has photos on the
front.
And on the back.
This is how I used the manila
envelope
The Photos that are kept inside
I left the back of the album
simple only adding pictures.
And there you have it, a very
easy to make Accordion Mini Album.
The one on the book was left with
no decoration inside and the covers were made out of playing cards, I plan on
making one of those also to keep a few business cards handy.
I hope you get some inspiration from today's tutorial. Have an Amazing Day!
=Di
I hope you get some inspiration from today's tutorial. Have an Amazing Day!
=Di


5 Scrappy thoughts:
This is absolutely stunning Di :) love the look of all the different layers! Fantastic :) tfs! xx
Wow! Fabulous book! Great to see so many photos along the way.. I would love to try making one of these..thanks for showing us how to..xx
Hope everyone is well at The Scrappy Tree..sorry it's been a while since I called, my father recently passed away and my life hasn't been the same since! Hoping to get back into crafting asap!
Have a great day. Gez.xx
That looks fabulous!
ohhhh Di! I LOVE it! What a fantastic design. A great way to add a lot of photos and all the other trinkets we save. I am definitely going to try this one!
WONDEFUL!!!!
Post a Comment