Kristin, Gayle, Julie and Diana welcome you to The Scrappy Tree!
We are four girls from different sides of the world who love to be creative. From California, Minnesota and Illinois in the US to Wales in the UK, we love sharing projects and trying something new, always keeping the sense of fun that brought us together.
I was looking at layering this week when I was making a few cards, and had tremendous fun with pigment ink, spray ink, tissue tape, paper, doilies, images, flowers, pearls and punches while making these!
As with my last post, both images are from Crafty Individuals but I'm afraid many of the other supplies are ones that were floating about in my stash and caught my fancy :) although you might recognise a few flashes of Mr Holtz in the stamping and tissue tape department! If you look closely at the card above you can see the Eiffel Tower off in the distance ...just! lol
What I enjoyed most about making these was layering up a neutral background with cream, beige and gold, and then choosing a colour to accent; with the second card the spray ink I used seemed to quite closely match the burnt oranges in the image.
Thanks for visiting! Happy scrapping this weekend :)
Hello! It's Julie here today with a few new paperbag gift pockets for you to look at! I had mentioned in my previous paperbag pocket post that I had been inspired by Michelle Wooderson's paperbag pockets. Her's are truly amazing. You can check some out HERE.
To make my paper bag pockets, I start with a simple lunch bag that you can get at the grocery store or Walmart. I have the bottom flap facing up and the opening to my left.
I then take the right side of the bag (the side with the bottom flap) and fold over to the left, covering my original opening. Once you fold it this way, turn the bag so the opening is facing away from you.
Then fold down part of the bag with the bottom flap. I end up folding down approximately 2 inches. At this point you can either glue, staple or stitch the bag just the way it is.
I chose to stitch my bag with the sewing machine. I run from top to bottom.
You will be left with two pockets to stuff. The first is the little one in front.
The second is the pocket from the original opening. Lots of place to tuck and stash goodies. Now once you have done this, you are free to decorate in any way you would like. Here's a few new ones I made.
The first paper bag pocket has some wonderful Cosmo Cricket papers on it. I love those vintage girls!
I have three small blank notecards tucked into the far pocket of this one.
The next one has some of the awesome 5 and Dime October Afternoon papers! I love that line!
This pocket comes with a little handmade note pad.
This one is one of my favorites! I used some scraps for this one!
This pocket holds 4 bookmarks!
This pocket holds a handmade card that could be given to a good friend!
I love that you can be so creative with paperbag pockets! Anything goes! They are wonderful little gifts. If you have any questions about making them (because I stink at giving directions), please leave your question in the comments! Also, I did just list these at my etsy shop. There are a few additional pictures there (particularly with the final pocket shown). Thanks for stopping by !
~Julie
Wednesday, January 25, 2012
Hello, Diana here with this weeks post; I just finished an online class from Big Pictures and would like to share two of the project I made.
The class was "Journey to Happiness: what Matters Most" by Lisa Day.
This is the Focus on what matters most mini album, it has my list of things I need to prioritize in 2012. I used a Mason Jar chipboard album from Maya Road and Studio Calico Memoir paper.
The Mason Jar stamp is from Cocoa Daisy and I used white embossing to make it pop.
This layout is my list of Prioritize Changes, the layout design is based on the the one Lisa Day made. I used leftover paper I had from the mini album.
To make the hearts I did THIS technique I saw in the Lily Bee blog made by Kay, very pretty, check it out.
Just wanted to share a dreamy little card with you today :) Using My Mind's Eye Bella Bella paper for the background I stamped some Inkadinkado swirls in gold and stamped the PaperArtsy caption.
The dreamy looking lady is from a collage sheet from Crafty Individuals.
I added some ribbon, the flower and the green gems from an embellishment pack from Scrapagogo...
...and the butterfly is cut out from the Bella Bella paper with some gold Stickles added to the body.
Hello,
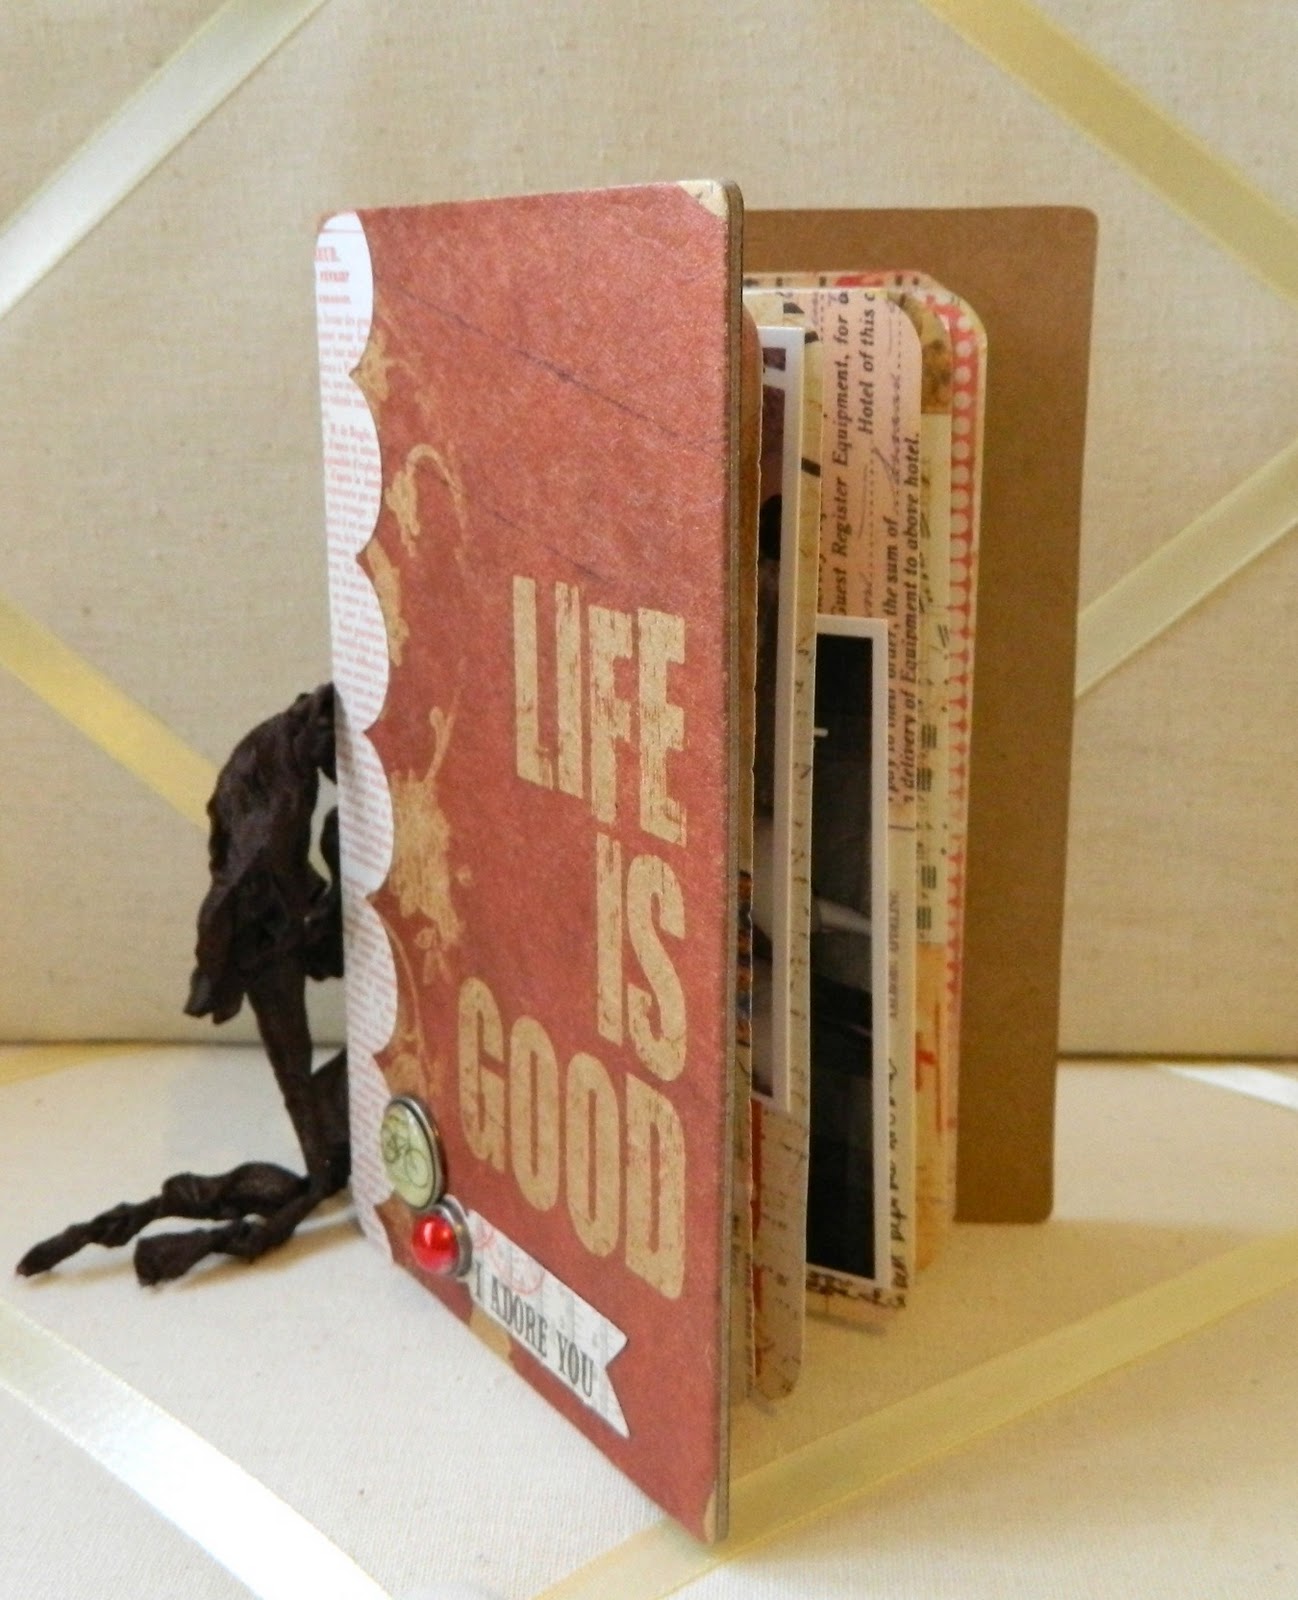
Diana here with this month’s Mini Album Tutorial; I like the variety of printed
book covers 7 Gypsies has, but I don’t always like to use rings to hold the
pages and I don’t own a binding machine. In this tutorial I’ll show you another
way of using these nice covers.
The cover is 3.5” X 5.5”, I used
paper from a 6” X 6” pad, I cut one side to 5” and folded them in half, and
these are the pages for the inside of the book.
The next three pieces are going
to join the covers. For the inside spine I cut a piece of cardboard 5.5” long
and thick enough to fit a small eyelet, I also cut a piece of paper to cover the side
of the spine that will show from the inside of the album. The paper that will go on the outside of the
spine is 5.5” X 3.5”, I scored a 1” line for the part of the paper that is
going on the front and left the back part longer, I scored another line a
little bit wider than the cardboard spine. The image on the right shows how I punched a decorative border.
Once my three pieces were glued together I punched out two holes and added eyelets. This image shows the inside of the spine.
I glued the back cover.
And the front cover.
This is how the front looks.
I punched out two holes on the book pages and put a piece of ribbon through the middle of them, and then I put the ribbon though the holes in the spine tying a tight bow on the outside to secure the pages.
Here is the finished album.
This album is a gift I’ll be giving to my husband on our anniversary;
the theme is the song The Story by Brandi Carlile that I dedicated to him, each
page has a verse from the song.
Since the papers have so much decoration on them I left the
embellishment simple and only used tags and paperclip dangles.
As always I hope I was able to bring some inspiration to your crafty world :)
Good morning! I hope everyone had a wonderful weekend! Today, I'd like to show you a gift that I made for my Grandmother. She is a crafter so I knew she'd love a handmade gift. I love paper bags for crafting. One of my favorite things to make is a paperbag album, but I was in a time crunch so I had to make something kinda quickly. I was inspired by Michelle Wooderson's paperbag gift pockets on her blog.
Here's what I made:
I took a paper bag and folded it in half. Then I folded up the flap a bit to form an extra pocket for goodies. Once that was done, I sewed it with my sewing machine along the edges. Once my pocket was complete, I added my papers (mostly from October Afternoon) and my ribbon and little mushroom. The cute little girl was from the Little Princess Vintage tag line that I got from
Pretty Little Studio etsy shop.
I wanted to add a few little mini cards, some little banners and some trims to her gift. Here's a look at the trims I added.
I made the tags that the trims were on with a Papertrey Ink tag die using ledger paper and paper from October Afternoon. I added some seam binding, a button and twine to complete the look.
This is so easy to make! I hope you play around with a paper bag today!
~Julie
Friday, January 13, 2012
Hello everyone!! Winter is upon us here finally in Minnesota and I thought it would be the perfect time to share some Winter Twinchies with you.
If you are new to twinchies, I'll offer a quick explanation as to what they are. Twinchies are 2 inch by 2 inch squares that you decorate as you wish. They are a lot of fun to create. I find they are fun to do when you've lost your crafty mojo. They can jump start your creativity!
Here's my Winter twinchies that I made for a swap.
I used some Pink Paislee paper as my base. I love the ledger look of it! Since Winter was the theme, I chose to add a snow flake to it. I did have some smaller snowflakes that would have fit completely on the 2 inch by 2 inch square, but I really liked the big snowflake and the way it looked by just showing a portion of it. The snowflake die is from Papertrey Ink. Once I got my snowflake cut on my Cuttlebug, I used some Dune ink by Color Box to ink edges of both the snowflake and ledger paper. I applied some Beacon 3 in 1 glue on the snowflake and applied it to the ledger paper. Once that was done, I cut some red and white twine and tied a bow. Simple!!!
If you have never tried twinchies, give them a go! They can really be fun!
Hello, Diana here to share a few
decorations I made for my scrap room. I wanted to make something personal for
my room; the idea came from a question Julie asked on our The Scrappy Tree
Facebook Branch group. If you could go back in time and see yourself as a child
what advise will you give?
For the Canvas I painted a wood letter D and part of the canvas with Jenni Bowlin Dabber paint in Stick Candy, I added the cute camera because taking photos is part of the things I love to do, the flowers are from Prima Marketing.
This is my main title, I mixed fonts from a Glitz flashcard, a chip piece form the Portrait collection, the letter b is from Prima Marketing and the e is from Donna Downey Canvas word Create, I used Glimmer mist to paint it.
The word happy is also from Donna Downey, I used Glimmer Mist to paint it, and the flower is from Prima Marketing.
My friend Erica gave me this pretty Tart Tin, I punched out a 2" circle and added stickers and brads from the portrait collection.
The inside of the Library Drawer has the word Creative, I used the remaining letters from the Donna Downey canvas word create and misted them in different colors, the rest of the letters, little flowers and acrylic flowers are from Prima Marketing, assorted lace, stickers and buttons completed the design of each space.
For the top I added the "&" with a clothespin and put a vintage wooden spool that my friend Erica also gave me, a few flowers, gems, ribbon and a button on top, the dangles and charms hanging from a piece of lace are from 7 Gypsies.
Have you made any decorations for your craft space? go to our Facebook branch group and post the pics so we can get some inspiration from you . You can also post the link to your blog there.
Kristin here, wishing you all a Happy New Year! For my first post of the year, I am going to focus a bit on our theme for the month and talk about Project Life. First up, our theme!
When TST girls and I brainstormed recently about our plans for the new year, we came up with some really fun and exciting ideas!! We are sure you'll are going to love them as much as we do! There was some talk about exploring new techniques, and textures, getting back to good ole' scrapbooking and lots of talk about classes and things we want to try...BUT the best news, we plan to share it all here!
One thing we knew for sure when we discussed each topic was that we each needed to organize a bit before we could tackle these awesome feats! I mean after all, we had one heck of a year between the four of us. Some of us got married, some of us bought our first house, got published in a scrappy magazine, got promotions at work, had surgeries:( , celebrated birthdays :) ,went on amazing vacations, found local FUN, visited family, attended craft fairs, opened Etsy stores, went back to school, met online scrappy friends, and met online friends in the flesh! Mostly, we enjoyed our lives and created lots of memories! With that, comes some stories and projects we plan to share and lots of pictures we have taken and gathered up, just waiting for the perfect project for them to be joined with. Okay, okay, I'm getting ahead of myself, back to organizing! One way we are going to do it this year is by selecting a Theme to keep us focused and hopefully to help spark our creative juices! We will announce it here and challenge you to join us each month!
This month’s Theme we thought had to start at the beginning, right? So here we go!
January's Theme is...Out with the OLD, In with the NEW!
Now, hold the phone! That doesn't mean we are not a fan of OLD, in fact many of us are too fond of old (if you know what I mean ). In that old antique that will be a perfect addition to our craft room or make an amazing repurposed project! What we mean by this month's theme is, let's leave the old worries, the old to do lists, the old unfinished projects and stress behind and bring on the New! The new projects, the new ideas, the new to do lists and the new opportunities!
So with that in mind, I ordered the Project Life kit by Becky Higgins, you can scope it out HERE if you haven't seen it already. This stuff is really cool! It makes scrapping easy and I really love that she has thought of everything. Watch this video to get a better idea!
What I personally like about it is it takes the pressure off finding your materials and gathering all those embellishments and really puts the focus on the pictures and the memories. I often comtemplate so much with with the design piece and this takes that out of the equation. It allows me to just remember the fun and the moments but most importantly, I get those moments and thoughts into a book I can share for years to come. I definitely will still create scrapbook pages and projects from scratch, I have way too much of an addiction to (hoarding) I mean buying scrappy supplies and designing my own combos, colors and layouts is still way too fun. I think of this program more as a way to KEEP UP, not get behind, not forget to scrap that funny or endearing moment. The beautifully designed cards and the uniquely organized pages, make it fun and easy to do so, that's for sure!
I chose the Clementine set, made up of oranges, blues, pinks, stripes, words, script and much much more. I did buy an album, only because if you can believe it, I have never owned a 12 x 12 album before now! I know, crazy right, that's what I said! It is a beautiful tangerine color that may loose style eventually but for now, it is cheery and matches great! You can use any 12 x12 three ring binder with the system. I also bought two different styles of filler pages. There are lots to choose from, just to keep it interesting. I did not choose more scrappy paper, which is another awesome thing about the system, you can pick and choose what part of the kit you need/want. One more thing and maybe my favorite feature, is the journaling cards come with a sturdy box to keep all your stuff organized, LOVE that!
Here are a few of my pages so far:
Overall all three took me about an hour (and ya they kinda look like it) but hey, I have Christmas in the can for the first time....ever and New Years is close to being done, so Yea! My last note and a few tips: Have some extra paper handy. As you can see, I used some kraft throughout to fill in the holes in case my pictures ended up being slightly larger or smaller than where I wanted to put them. You may also note I cheated a bit, there is some Washi tape in there, a stamp and some twine just to add a little something something. One complaint, all of the journaling cards are printed portrait but fit landscape in most of the places I wanted to put them....hmmmm.
Well, that's it so far, thanks for stopping by! I hope you find something Old to leave behind and something New to begin 2012 with!