Kristin, Gayle, Julie and Diana welcome you to The Scrappy Tree!
We are four girls from different sides of the world who love to be creative. From California, Minnesota and Illinois in the US to Wales in the UK, we love sharing projects and trying something new, always keeping the sense of fun that brought us together.
Just a reminder to get those ATC's in, we will be closing the swap at the end of the month, matching them up and sending them back out asap. Please let us know via email or comment here if you are sending one in late,so we know to wait for yours.
I have to admit that I really don't use CDs all that much anymore and have got plenty lying around the house not really doing anything much! I wanted to make a housewarming gift for a family member and thought that I could alter a CD to make a wall hanging for her new place.
Supplies used: DCWV Once Upon A Time paper, Cuttlebug Swirls die-cut letters, Papermania flower and leaf vinyl stickers, cardboard butterfly from Hobbycraft, golden heart from personal stash, white uniball pen, gold Stickles, Fired Brick distress ink, black velvet ribbon from personal stash, stamp on back of CD by Inkadinkado, Red Pepper alcohol ink.
And just to show that there is a CD under there, this is the back view! Happy recycling!
In keeping with our reduce, reuse & recycle theme, I wanted to share a piece I salvaged from a local Goodwill store. I found a basket full of cedar blocks and cedar blocks with hangers attached for $1.99, and knew I could do something with them. I think they are normally used to help keep the buggies off your clothing or out of your closet altogether but I instantly wanted to paint them and see what I could come up with. So here you go;
This is the backside, I like this side only because you can see the Hambly Screen Prints, gold doily rub on I used on both sides but can only see in this picture. Hambly does amazing rub ons that work on any surface, including fabric, they are definitely worth checking out! The Create 3D sticker is SEI.
Next up, a cedar block Mini Album. This is for a friend that is retiring soon, so I went with a LUCKY theme and poem to match. Front cover, embellished with a mini domino, random rub-on, Tim Holtz cardboard domino embellishment and a page from a poem book.
Side profile, showing the width of the cedar blocks and the Martha Stewart twine I used to keep it closed with. I threw in the random clip just for color.
Inside pages with the Luck themed poem. I printed it directly on this beautiful fiber paper. Lastly I determined how many pages I will need and attached the back of the first and last pages to the cedar blocks after folding it into four equal pages.
Thanks for stopping by, enjoy your recycled crafting projects !
Today we bring you some beautiful projects by guest Designer Diana Pena. Di has shared beautiful projects with us before but these really top all the others. The best thing about these projects is, they are GREEN! We have been trying to focus on all things GREEN this month and truly love doing our part for Mother Earth. Take a peak at Di's creations below and don't forget to see the GREEN blogs link at the bottom of the post where you can find lots of GREEN solutions and resources.
*All of these projects are made from Toilet Paper rolls, simply Amazing!!
Diana's note;
What I like about using the TP Rolls, besides of the obvious “Going Green”, is all the possibilities there are using the inside Tag, it can be used for journaling, to add photos or even for a gift card. Another important reason is the savings and since tha size is not that big you can use scraps of your favorite paper. =Di
TP Roll Tips:
Flatten under books or use a bone folder to fold the sides.
Keep them all together with a tight rubber band, that way they will take up less space in your craftroom and at the same time keep them flat.
Jenni Bowlin Varsity Paper, Journaling Cards and Block Alphas.
Gems
Cotton Twine
Ribbon
Card 3:
Chalk Ink
Jenni Bowlin Brown Transferware Paper, Journaling Cards, Frame Printed Tickets and Brown Apothecary Stickers.
Cotton Twine
Brads
Tim Holtz Paper Distresser
Thank you Diana for sharing your beautiful GREEN projects with us today :)
We will be sharing more GREEN projects throughout the rest of the month. In the mean time, check out some other GREEN blogs and see how you can make a difference. Bloggers Unite!
In keeping with our recycling theme for this month I thought that I simply must pay tribute to that most common and yet can be the most lovely of projects - the card made using scraps of leftover paper from your stash!
I know that most of us probably have a bag or box we keep the off-cuts from our crafting in; this is a call out to those who are currently putting theirs in the bin!
I can guarantee that given the right project, you'll find a use for most of the little scraps that you might be inclined to put in the bin.
I made this card using a spare piece from a Basic Grey Scarlett's Letter piece of 12x12 that I had used to cover a mini-album, some pieces of leftover Core-dinations cardstock (the black card) and a piece of scrap paper from a sketch pad (the stamped image). Add some embellishments and ink (colouring and stamping) and a bit of white pen, and you've got a worthwhile use for those scraps that could have gone in the bin!
I'd like to say a big Thank you to those of you who tried out the Inspiration Challenge last Monday! Here are some to the beautiful creations that were uploaded to our Ning site.
This one is from Gayle: The next card is from Diana:
This layout is from Kristin:
You all are amazing, creative ladies! Thanks so much for joining in the fun! Hope to see you next month!
Happy Saturday bloggers. I don't know about you, but this weekend seemed a long time coming. Today I would like to show you a way you can recycle used dryer sheets on a project!
To begin, I gathered an old newspaper and assorted Glimmer Mist colors (even a Scrappy Tree Shimmer Shine!!). Next, I randomly sprayed the Mists on the dryer sheets until I liked how they looked.
The picture below shows how the dryer sheets ended up. They did take a while to dry but I sped up the process by hanging them on a line outside.
Once the dryer sheets were dry from the Mists, I stamped a large butterfly from Inkadinkado using Stazon ink all over a dryer sheet. Note: I only used one of my sprayed dryer sheets for this project. I made a second one because I assumed I would mess up. I actually didn't~!
I adhered the dryer sheet to a white card using Yes Glue. Once the glue was dry, I used a Bazzill Stitch template to stitch on my card. I stamped another butterfly onto a scrap of pink patterned paper and cut it out. I glued it to the card, once again using Yes Glue. I added some sparkle to my cut butterfly by using Stickles. I was very pleased with the coloring that the Mists added to the dryer sheet and I also love the texture it gave the card. I will be working with dryer sheets more in the future!
Please stop back tomorrow and see the lovely creations made by those who took us up on the April Inspiration Challenge! Enjoy your Saturday!
Happy Monday Crafters!!! It's that time again.....Inspiration Monday. If you haven't played before, here's how it works: I upload an image or website that you can draw inspiration from. You create any kind of project you want, a card, an altered item, journal page, layout, the sky's the limit!! You then upload your creation to our ning challenge groupbefore midnight of Friday, April 16th. I will post our creations on this blog on Saturday! Come and play along if you can. If you have any questions, just ask in either the comment section here or on our ning site!
Without further ado, here's this month's Inspiration Challenge:
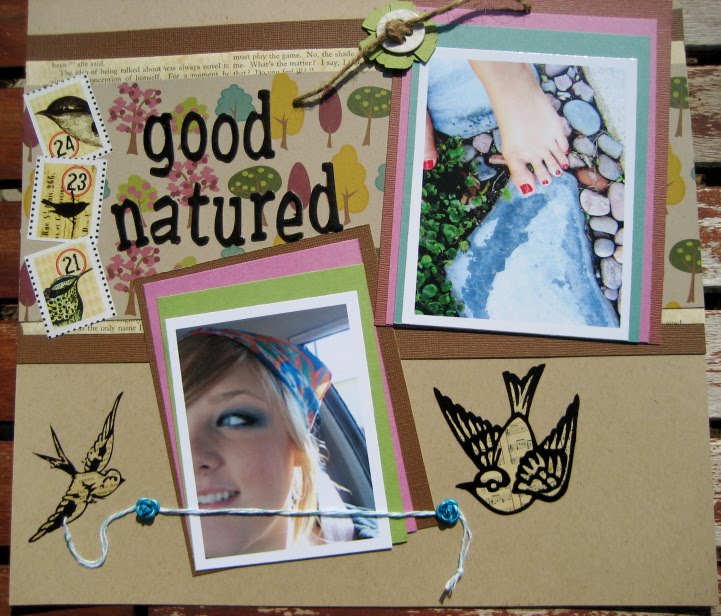
When I was unearthing our warmer weather clothes, I came across one of my favorite t shirts. Now use this as a springboard for your project! Here's what I created:
I loved the red in the shirt so I had that be my background paper. The textured cardstock paper is so cool. It is made by Wasau papers and can be found at Target. Then I used some AC cardstock (Earth tones) and I free handed the waves. I swear I have a wavy template and a cutter but I couldn't find it for the life of me!! One of my favorite parts of this shirt has the trees so I used a Maya Rd. tree, painted the trunk with brown acrylic paint and I covered the leafy part with Little Yellow Bicycle glossy paper. I free hand cut some clouds and glued on. I matted my photos with kraft cardstock and put them on. I used acrylic paint to paint on the dots similar to the tshirts dotting. Finally I added the Thicker title and Martha Stewart punched birds.
I can't wait to see how this shirt inspires you! Remember, upload your creations HERE before the end of Friday, April 16th. If you don't want to play along, or don't have time to, please give all our participants some comments!! Thanks!
Being Earth friendly is not only "in" but it can also be fun and a great way to craft! One day I was thinking of recycling things for crafting and I found myself staring at a box. That box was the catalyst for this card! I tore off a flap to the box and I used it just as it tore off. I did not cut it or alter it in anyway. I simply tried to fold it. Once folded, I sprayed it with a little bit of Glimmer Mist in Copper. I used a little bit of Crackle Paint on the bottom right of the card and I let it dry. While it was drying, I decided to use a Basic Grey chipboard piece and Prima flowers on the front. I stamped a "1 of a kind" sentiment from Hero Arts on top of the Crackle Paint.
This was a very fun way to recycle an item I had in my home and I look forward to bringing you more recycling and/or Earth friendly projects this month!
The Scrappy Tree wishes a Blessed and Happy Easter to you and yours.
We are proud to announce our Spring Bloom winner...
Congratulations Peggy! These lovely flowers are yours to create more beautiful cards with :)
We are thankful to everyone who participated in our challenge and look forward to more fun next month. Peggy, Diana and Cori, please send us your address to thescrappytree@hotmail.com.
Quickie project to share with you today just in time for Easter! With Easter Sunday just around the corner, many of you will have those chocolate eggs and bunnies lined up and ready to go! In our house this year, some of us are dieting (!) so we're exchanging some gifts in place of the usual chocolate :)
I found some cute little stamps that were begging to be used on an Easter gift tag!
I used some plain yellow and white tags, and stamped the images using black StazOn. I coloured the images with water soluble pastels, and added some details with a black Sharpie and white gelly roll pen when everything was dry.
What is Steampunk? SteamPunk is an amazing style. It is very unique and beautiful set in the Victorian age, mixed with explorers and marvelous machines with a splash of modern technology. It really is whatever you can dream up and reminds me a lot of Leonardo Da Vinci. You can google Steampunk and find many samples. Having worked for Disney for many years, this one is my favorite (thanks to Jennie from The Artistic Stamper for taking this picture and sharing it on her lovely blog; http://theartisticstamper.blogspot.com/ )
Details for the swap below, they can also be found on our scrappy community under events/ ATC swap.
Send To:
Kristin Langlais
13671 Palomar Street
Westminster, CA 92683
Deadline: April 30th 2010
Create one ATC in the Steampunk theme and we will swap with other folks at The Scrappy Tree at the end of the month. Please upload and image to the Scrappy Community Here.
For fun, we will vote on a winner that will receive a custom ATC kit, handpicked by The Scrappy Tree team.
Need more info on Steampunk- Google will work but also you can go Here (these are some beautiful samples from the Gothic Arches blog - Steampunk challenge. If you click on each name, it will pull up each person's blog with artwork. they are all very cool! And our friend Jennie, did one for this too!)
Good morning Crafters! I don't know about you, but time is just rocketing by and the upcoming Easter holiday is coming so fast, I could barely get ready for it! I thought I would share two of the projects I made with an Easter theme! The first is an Easter Egg and the second is a card to give to a loved one!
This Easter Egg began as a simple paper mache egg from Hobby Lobby for under $1. I covered the egg in Vintage sheet music pieces that I tore and adhered with Mod Podge. I will warn you, this was a MESSY project. I molded the pieces of sheet music to the egg constantly covering with Mod Podge as I went and my hands were covered. :) It was a happy kind of messy though! Once the outer layer of Mod Podge was dry, I sprayed brown glimmer mist into my hand (another kind of happy messy) and I rubbed it into the egg. Then I used some pastel ribbon and a beautiful button given to me from my friend Kristin to complete my egg!
The second project I have to share today is an Easter card. I used Bazzill cardstock as the base for the card. I used Cosmo Cricket papers and diecuts for the card as well. I used Suede Glimmer mist to try and age the vintage sheet music on the card and paper. Once things looked the way I liked, I applied a small amount of glue and used my sewing machine to add a homespun feel. The diecuts were applied after I sewed the layers together and I adhered all materials to my card using Yes glue! I used my Marvy flower punches to add the finishing touches to the card, making flowers out of my vintage sheet music. I added a Prima pearl to my flowers.


